⏱️ Worker — Scheduled Tasks
Worker is the component in Octo that runs in the background and executes scheduled jobs. Tasks such as sending mails, printing reports as PDF, and running periodic stored procedures are handled through Worker.
This page explains how to use Worker (admin / power user). For installing the Worker service on the server: Worker Installation
How Does Worker Work?
SP / user adds task → Worker queue → Worker service polls → Runs it → Updates status
- A task is added to the queue in three different ways:
- Automatically by SPs within business processes — e.g. receivables follow-up approval, bonus calculation, system setting alerts (via
Sp_Rn_Sys_CreateWorkerTask) - User action on screens — e.g. the "Send Mail" / "Print" buttons on screens
- Manually from administration screens — via the Worker and Worker - Detail screens described on this page
- Automatically by SPs within business processes — e.g. receivables follow-up approval, bonus calculation, system setting alerts (via
- The Worker service running on the server (
Octo.Worker.exe) polls the queue periodically. - It picks up tasks in the Ready state, runs them, and records the result.
- If an error occurs, it automatically sends a notification mail to the responsible people.
Two Separate Screens, Two Different Scenarios
Octo has two screens for managing Worker tasks. Both show the same data; the difference is ease of use and level of detail.
1. Worker (Simple View)
Path: Administration → Worker
A simplified screen for daily tracking. You filter task statuses with colored cards, and add, run or pause a new task with a single click.
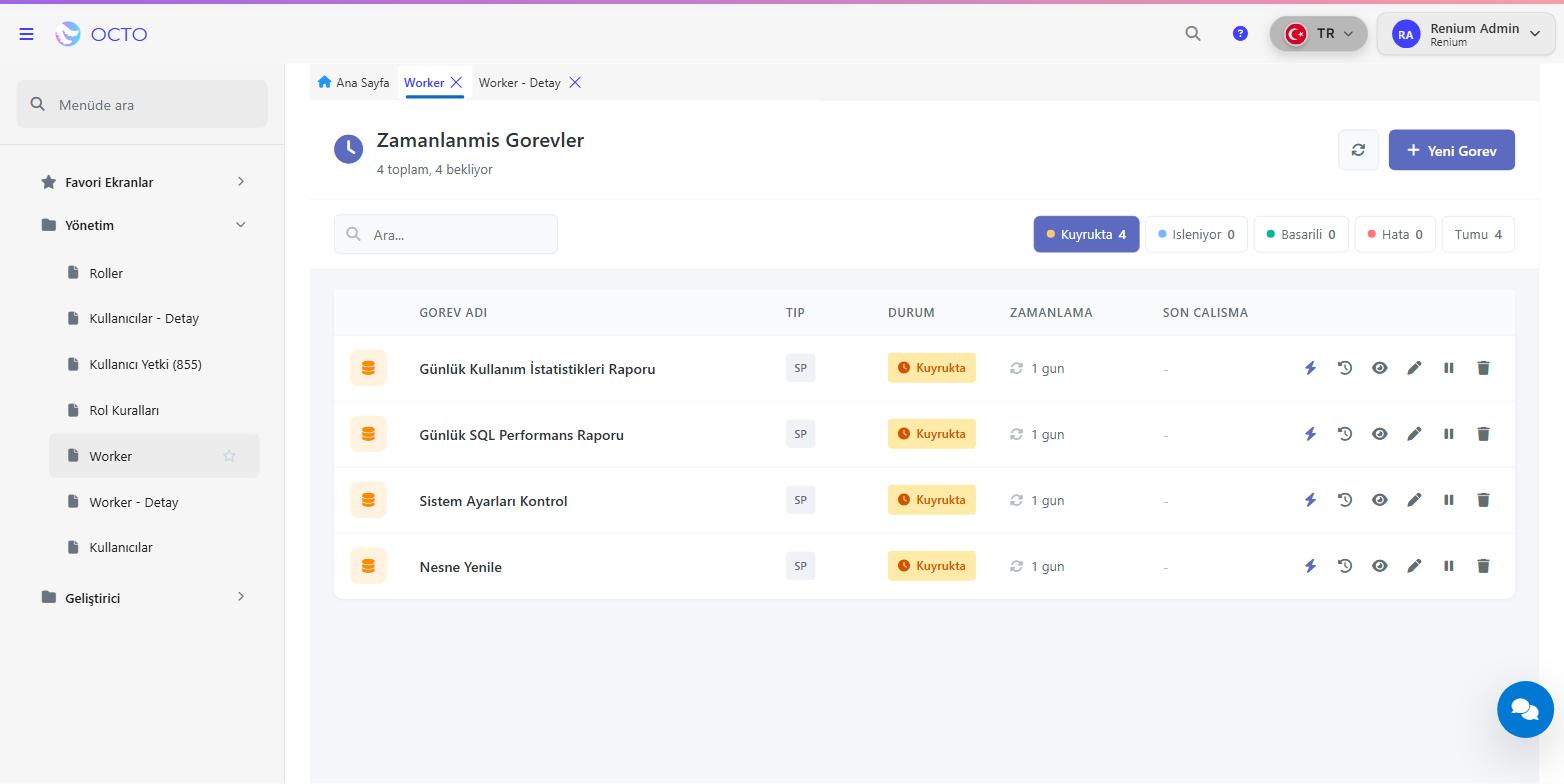
What is on this screen:
| Section | Function |
|---|---|
| Status cards (In Queue / Processing / Successful / Error / All) | Filter tasks by status |
| Search box | Search by task name |
| + New Task | Wizard-style task creation |
| Task list columns | TASK NAME · TYPE · STATUS · SCHEDULE · LAST RUN |
| Task row actions | ⚡ Run · 🕐 History · 👁️ View · ✏️ Edit · ⏸️ Pause · 🗑️ Delete |
For daily operations (adding, running and monitoring tasks) this screen is sufficient.
2. Worker - Detail (Advanced View)
Path: Administration → Worker - Detail
A professional screen in a master-detail structure where all columns and sub-tabs are visible. You manage the task's parameter map, attachments and mail settings from here.
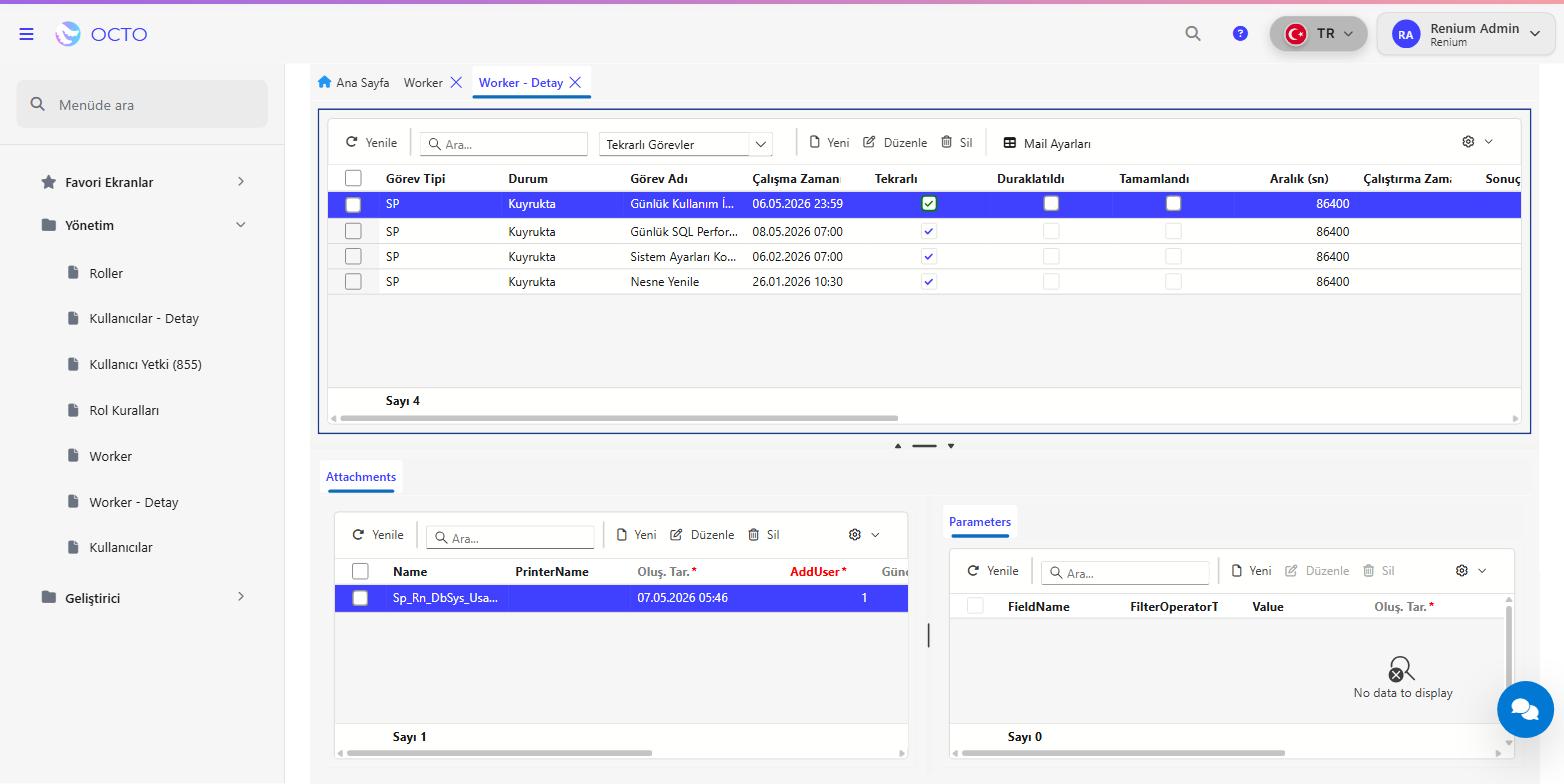
Toolbar: Refresh · Search · Recurring Tasks (filter) · New · Edit · Delete · Mail Settings
All columns on this screen:
| Column | Description |
|---|---|
| Task Type | SP / Mail / Print |
| Status | In Queue / Processing / Successful / Error |
| Task Name | Name of the task |
| Run Time | First run or last scheduled run date/time |
| Recurring | Whether the task is recurring |
| Paused | Whether the task is paused |
| Completed | Whether the task is completed |
| Interval (sec) | Repeat interval in seconds |
| Execution Time | Next scheduled run time |
| Result | Result/error message of the last run |
| Sender | Sender alias for mail tasks |
| Subject | Email subject for mail tasks |
| Content | Email content for mail tasks |
| Recipients | Recipient list for mail tasks |
Sub-tabs (for the selected task):
| Tab | Function |
|---|---|
| Attachments | Attachments bound to the task (SP reference, report template) — columns: Name, PrinterName, Created Date, AddUser |
| Parameters | Filter / parameter definitions per attachment — columns: FieldName, FilterOperatorType, Value |
Use this screen for advanced scenarios such as parameterized reports, mail attachments, multiple attachments and custom filters.
Task Types
| Type | What it does |
|---|---|
| Sending email — system notifications, user-triggered mails, mail with reports | |
| Report printing — sending a report to the selected printer as PDF/physical output | |
| SP | Running a Stored Procedure — periodic checks, bonus calculation, cache refresh |
Examples on the screen:
| Task Name | Type |
|---|---|
| Daily Usage Statistics Report | SP |
| Daily SQL Performance Report | SP |
| System Settings Check | SP |
| Refresh Object | SP |
Creating a New Task
Open the Administration → Worker screen. Click the + New Task button at the top right. The wizard that opens consists of 3 steps.
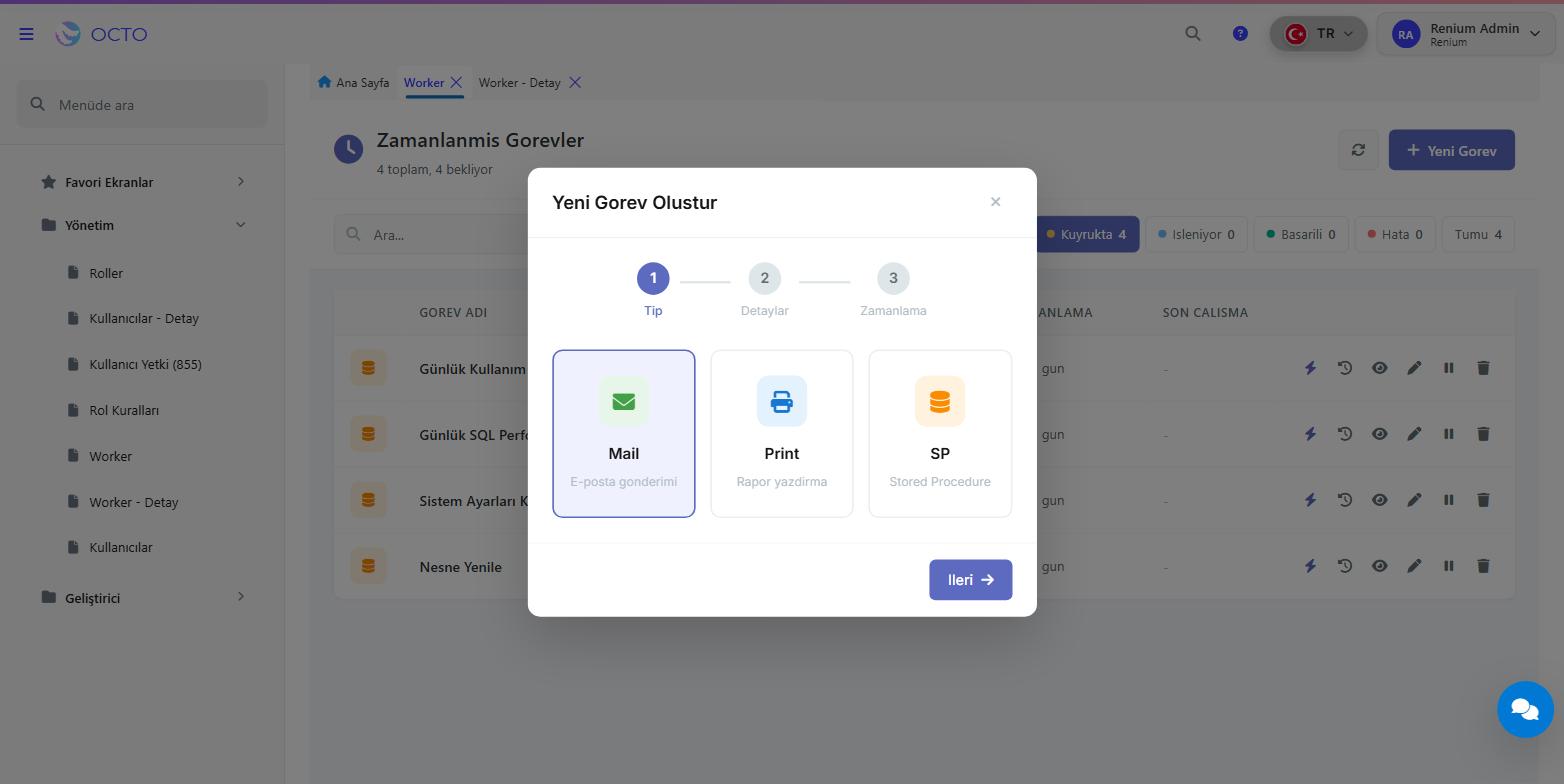
Step 1 — Type Selection
Select the task type: Mail (Sending email), Print (Report printing) or SP (Stored Procedure).
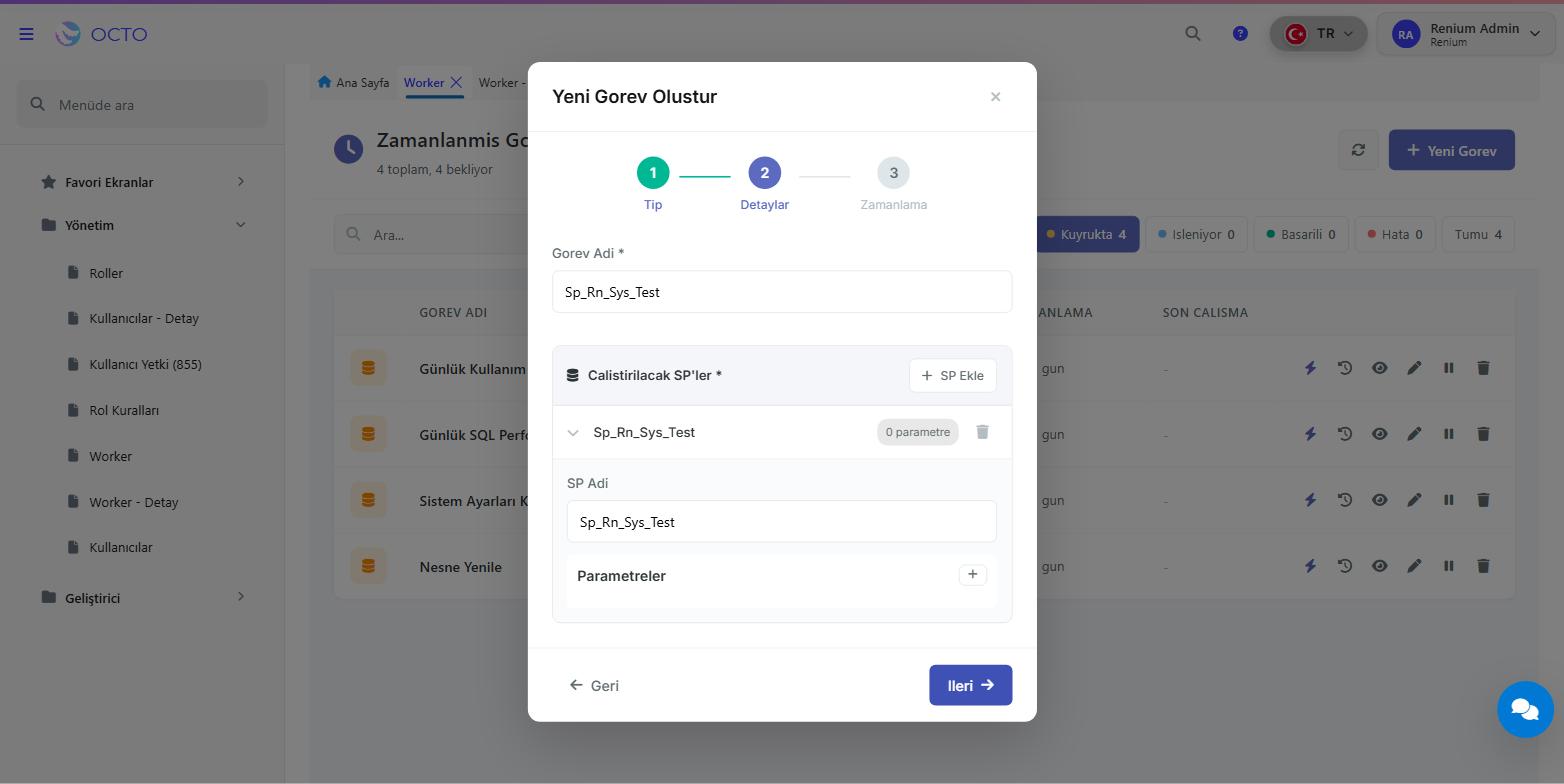
Step 2 — Details
Fields to be filled depending on the type:
- Mail: Task Name · Sender (default: System) · Subject · Recipients (TO — comma separated) · CC · BCC · Content
- Print: Task Name · Report name · Printer · Number of copies
- SP: Task Name · SPs to run (added via + Add SP; for each SP, SP Name and Parameters are entered)
Step 3 — Scheduling
- Start Time: Enter the first run date/time.
- Repeat: If checked, the task repeats automatically. In this case additional fields appear:
- Every: The numeric value of the repeat interval (e.g. 1, 5, 24)
- Unit: Second / Minute / Hour / Day
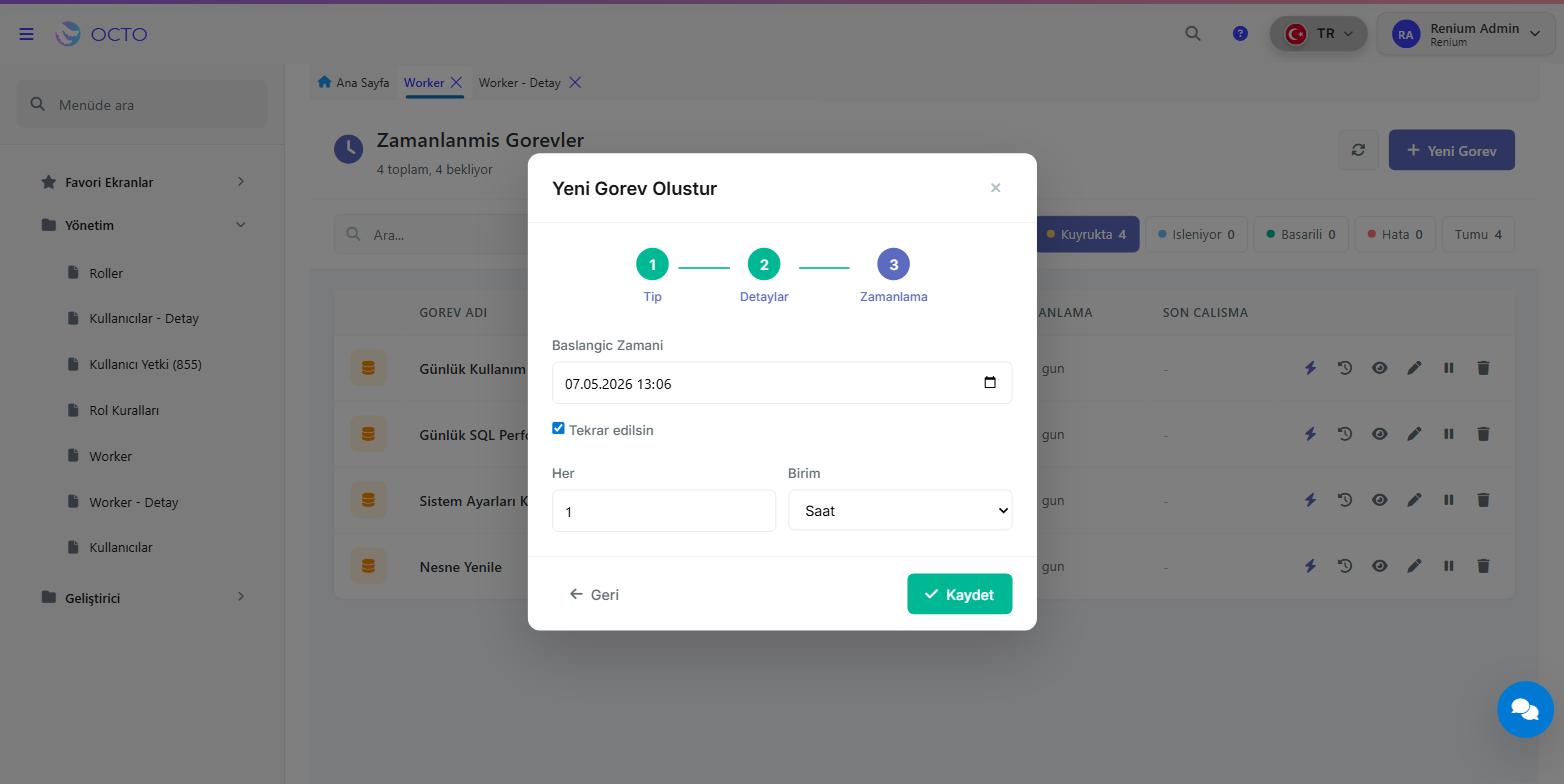
Press the Save button. The task is added to the list with the In Queue status; the Worker service runs it when its turn comes.
In mail tasks, recipients are separated by a comma (,), NOT a semicolon (;). This is a restriction tied to Worker's SMTP standard.
Task Statuses
| Status | What it means |
|---|---|
| 🟠 In Queue | Task is registered, waiting for Worker to pick it up and run it |
| 🔵 Processing | The Worker service is currently running it |
| 🟢 Successful | Completed, result logged |
| 🔴 Error | Got an error while running; notification mail sent |
Click the Error card and open the history (🕐 icon) of the relevant task — the error message is logged in the result field.
Recurring Tasks
A recurring task (e.g. bonus calculation every night):
- In the New Task wizard, check the Repeat box.
- Enter the interval value in the Every field and the time unit in the Unit field:
- 5 minutes → Every:
5, Unit: Minute - 1 hour → Every:
1, Unit: Hour - 1 day → Every:
1, Unit: Day
- 5 minutes → Every:
After completing the task, Worker automatically schedules the next run.
When you want to stop a recurring task, it can be disabled with Pause (⏸️); it can be removed entirely with Delete.
Mail Settings
For Worker to be able to send mail tasks, SMTP settings must be configured. This is checked from the Mail Settings button on the Worker - Detail screen (a window that opens onto the Tb_Rn_Sys_MailSettings table).
Required fields:
- Host (e.g.
smtp.gmail.com) - Port (587 — TLS)
- EnableSsl ✅
- UserName (sender email)
- Password (App Password required for Gmail)
Without correct mail settings, no mail task will run and error notifications cannot be delivered either. It is the first step to take in new installations.
Troubleshooting
| Symptom | Possible Cause | What to Do |
|---|---|---|
| Task keeps staying In Queue | Worker service is not running on the server | Installation page → Step 7 |
| Task gives an Error (mail) | SMTP settings wrong / App Password missing | Mail Settings button |
| Task gives an Error (SP) | Runtime error in the SP | Read the error message from the history, test the SP manually in the DB |
| Error notification mail not arriving | ErrorNotification configuration or SMTP broken | Check appsettings.json and Tb_Rn_Sys_MailSettings |
| Report attachment PDF not arriving / empty | Embedded connection string in the report template is stale | Open the report in the Octo Web designer and save it again |
For the technical detail of a task (parameters, attachments, status history), click the relevant task row on the Worker - Detail screen and look at the sub-tabs (Attachments / Parameters).
Related Pages
- Worker Installation — Installation of the Worker service on the server (sysadmin)
- Authorization — Management of access permissions to Worker screens